DSLR Cameras, Photography, Photography Tutorial
What are Shutter Speed, ISO, and Aperture?
Jan
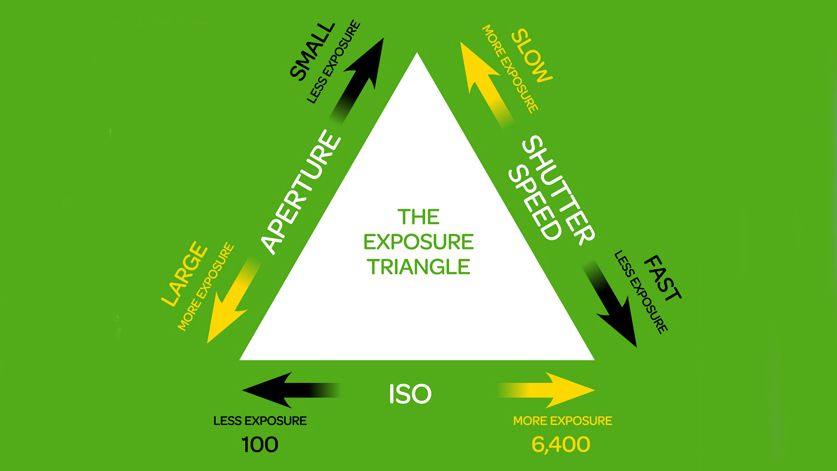
Shutter Speed, ISO, and Aperture and the “three kings of photography” and come together to create the “Exposure Triangle”. “Exposure” refers to the amount of light the enters the camera and hits the digital sensor, and is basically a measure of how bright or dark a photo is. While most DSLR cameras have automatic modes that will set the right shutter speed, aperture, and ISO for you, these modes limit what you can achieve with your camera. If you understand what shutter speed, ISO, and aperture are individually and how they work together, you will be able to take full control of your camera and be able to push the limits of what you can do with it!
What is Shutter Speed?
Shutter Speed is the length of time the camera shutter remains open to let light into the camera sensor, and it is typically measured in fractions of a second. The slower your shutter speed, the more light will touch the sensor. For example, a shutter speed of 1/2 will allow more light to touch the sensor and will produce a brighter photo than a shutter speed of 1/200.
If you are taking a photo and it is too dark, you could use a slower shutter speed to allow the camera to gather more light. If you are shooting something that is moving quickly, you will want to use a faster shutter speed. Fast shutter speeds have the effect of freezing motion in the scene you are photographing, whereas slow shutter speeds will blur the motion in a scene, as seen in the photos below.
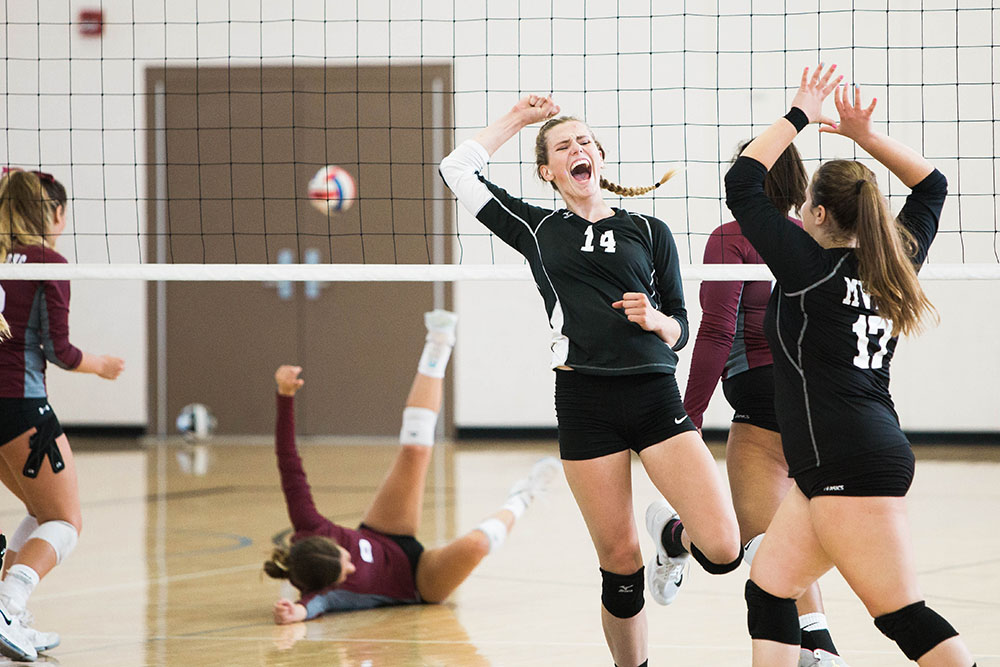
When photographing sports events, you will want to use a fast shutter speed in order to keep all of the fast-moving players in sharp focus, as shown in the photo above.

What is Aperture?
Aperture is a hole within the lens, through which light travels into the camera body. This is controlled by a small set of blades in the lens that control how much light will enter the camera; when you adjust the aperture, you are widening or closing down the hole that this set of blades creates. Aperture is expressed in “f” numbers.
Aperture also controls the depth of field in your photo. To achieve a shallow depth of field, set your f-stop to a low number (like f/2.8) to widen your aperture and allow a lot of light into the lens. To achieve a deep depth of field, set your f-stop to a high number (like f/11), creating a more narrow aperture and allowing only a little light into the lens.

What is ISO?
ISO is a way to brighten your photos when you can’t use a longer shutter speed or a wider aperture. As you increase your ISO value, your camera sensor becomes more sensitive to light. Meaning that a lower ISO value will result in a darker image, and a higher ISO value will result in a brighter image.
A higher ISO value can be very useful when shooting in low light without a tripod, but raising your ISO can come at a cost. As the ISO rises, so does the visibility of graininess/noise in your images. Have you every taken a photo with your phone camera at night and noticed that it looks really grainy? This is because the camera tried to compensate for the lack of light by choosing a high ISO.
Every camera is different, so do a few tests with your camera to see how high of an ISO you can shoot at without ending up with a grainy image.
See Also:
7 Common Beginner Photography Mistakes and How to Avoid Them
How to Make a Photo Black & White Except One Colour
Benefits of Using Lightroom Presets
How to Shutter Speed, ISO, and Aperture work together?
Creating a harmonious exposure using these three settings is a juggling act. As soon as you make any change to or decision about one element, you will need to compromise with another. Generally, you can use your ISO setting to use the optimal combination of aperture and shutter speed in situations where the lighting would not typically allow you to. Just be careful that you are not increasing it too much, as you do not want grainy images!
For example, you may find that shooting at 100 ISO results in camera speeds that are too slow to hand hold without camera shake, but if you increase the ISO to 800, allowing in more light without changing the shutter speed, you may find that your shutter speed is now fast enough to hand hold.
Another example of how these settings work together is when you are determining the depth of field in your photograph.
To achieve a shallow depth of field, set your f-stop to a low number (like f/2.8) to widen your aperture and allow a lot of light into the lens. You will have to adjust your shutter speed to be faster in order to compensate for all the light coming into the lens. When you are shooting with a low f-stop you do need to be careful to make sure you are still getting all of your subjects in focus! You will need to remain directly in front of them or else parts that should be in focus will be shifted out of the shallow focal plane.
To achieve a deep depth of field, set your f-stop to a high number (like f/11). This will narrow your aperture and significantly decrease the amount of light coming into the lens. You will need to shoot with a slower shutter speed, but these settings will then result in a deep depth of field.
In either of these situations, if you find your shutter speed/aperture combination is not allowing the proper amount of light into your camera, you can compensate by adjusting the ISO.
How do I decide which settings to use?
This is where your own creativity and intuition as a photographer come into play. A good starting point can be to decide which element is the most important element for the photo and then set that first. For example, if you are shooting a landscape, you will want to ensure you have a deep depth of field, so you should set the aperture first. Once you have set this, you can set the other two settings in a way that complements this first setting.
The chart below shows how various settings of each of these elements may play out in your photograph. Keep this in mind as you decide how to set up your camera!

If you are not ready to fully move onto manual mode, there are two modes you can try first: aperture priority and shutter priority. Aperture priority will allow you to set the aperture you want to use, and then the camera will automatically select a shutter speed that works that with aperture. Shutter priority works essentially the same way, allowing you to set the shutter speed and the camera to automatically select the correct aperture.
Setting the shutter speed, ISO, and aperture is a balancing act, so the best way to learn how to do it is to experiment! The more photos you take and the more you learn about your camera, the better you will get at setting them.