Photography
Tips for Creating Stunning Black and White Photographs
May
Converting a photo to black and white can produce stunning results, but editing a photo to be black and white is not as simple as clicking one button to remove the colour. When editing a colour photo to be black and white, you have to be careful, or else you could end up with a flat, dull image. So how to you make sure your photo looks as great in black and white as it did in colour? By following the tips we have below, you can be confidence that your converted photos will look gorgeous!
How to Convert Colour Photographs to Black & White
There are two main ways to convert your colour photos to black and white: converting them to black and white first, and then making adjustments, or processing for colour first and then convert to black and white.
Converting to Black & White First, Then Making Adjustments
This is the most common way to convert photos to black and white! To do this, click on “Black and White Treatment” in the “Basic” section of Lightroom’s “Develop” module. This instantly converts your photo to black and white, and also removes the option to adjust vibrance and saturation, as they are not applicable to black and white images.

After you have converted your photo, you can adjust the exposure, contrast, clarity, tone curve, etc. By converting to black and white first, you have made it possible to see how each adjustment affects the end result.
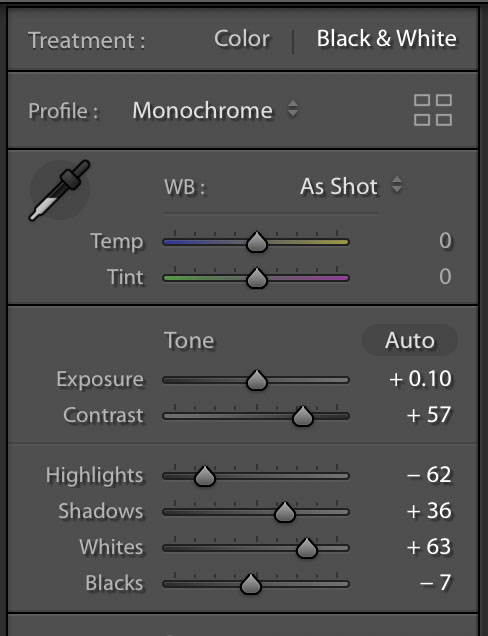
This is how each of these sliders will affect your black and white photo:
Exposure: This sets the overall brightness of the photo and should be adjusted first. If you started with a colour image that had already been processed, you may not need to adjust this.
Contrast: Most black and white images benefit from higher contrast than you would use if you were processing a colour photo.
Shadows: This slider adjusts the darkest tones in your photo independetly of the others. With this tool, you can make the shadows in your photo lighter or darker.
Highlights: The opposite of the Shadows slider, this slider adjusts the lightest tones in your photo independently of the other tones. Use it to make the highlights lighter or darker.
Clarity: This slider increases to mid-tones in your photo, which emphasizes sharpness and texture. When you adjust the Clarity, your photo may become darker, so you may need to readjust the Exposure or Shadows sliders in order to compensate for this.
White Balance: After adjusting the other sliders, you can go to the Temp or Tint sliders to see the effect they have on your photo. These sliders change the colour balance in your photo, and therefore the overall tones. Experiment with these to see if they improve the tones of your image.
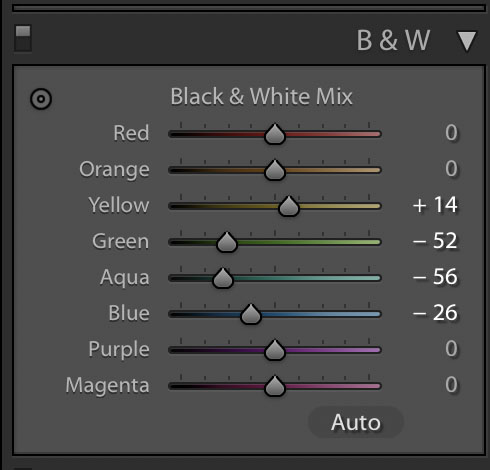
In addition to those adjustments, you can scroll down to the “Black & White Mix” tool, located just below the “Tone Curve”. With this tool, you have tons of control over the tones in your photo. Here, you can lighten or darken certain colours within your photo. For example, if you slide the blue slider to the left, you will cause the blue sky (or anything else blue) in your image to darken. This is a great way to adjust the contrast in your image and create greater separation between the tones in your image.
Process for Colour First, Then Convert to Black & White
This is a less common way to convert images to black and white, but it can work too. In this method, process your photo in the same way you would if you were going to leave it in colour. Then, follow the steps above to convert it to black and white.
This method may not produce as consistently good results, but it can save you time if you are going to process the image in colour as well anyways.
Tips for Great Black & White Photos
Now that you know how to convert your photos to black and white, here are some tips to make sure you get the best results possible.
Lots of Texture
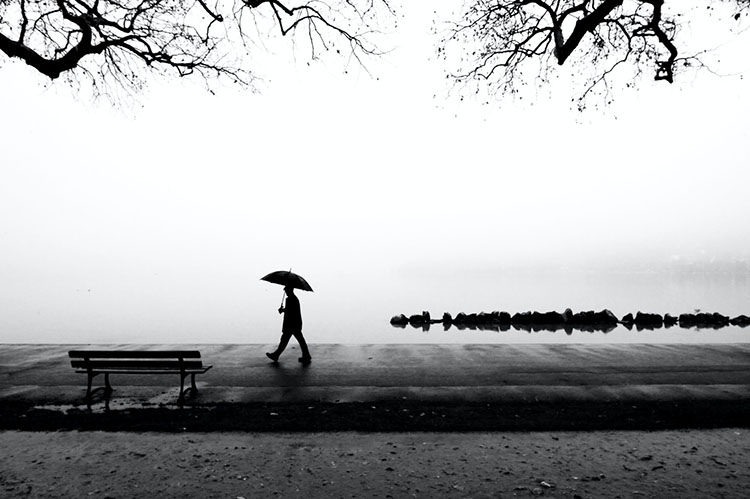
Photos that have lots of texture, areas of high contrast, or some sort of moody atmosphere make the best black and white photos. As you are removing the colour from the photograph, you will need something like texture or strong contrast to add interest to the photo and keep it from looking flat.
Make Whites White and Blacks Black
Black and white photography is all about light, shadows, and the contrast between them. Be sure that you have a solid black and solid white in each image. Simply converting an image to greyscale and forgetting about the black and white points will result in a flat image.

Don’t Forget About Greys
Although it is important to have a black and a white in your image, good black and white photos maintain a wide range of greys in between them. This is how you add texture and create depth in your images.
Focus on Your Composition
Without the distraction of colour, composition becomes even more important, as your eyes will be drawn to the lines and shapes in the photos. One of the strongest compositional elements is leading lines – any line or elements that make up a line that recede toward the horizon line. These will pull your eyes into the frame. When working in black and white, embrace the Rule of Thirds, negative space, and the golden ratio to create strong composition.
It can take time to get the hang of editing black and white photos if you are used to editing in colour. With these tips, though, you will have a firm foundation to get started on. Just start experimenting with different settings and photos until you find what works for you!