Blog, Lightroom Presets, Lightroom Tutorial, Photography, Photoshop Tutorial, Uncategorized
How To Use the Spot Removal Tool In Lightroom
Why Use the Spot Removal Tool in Lightroom?
Although getting the composition and settings correct in-camera is what all photographers try to achieve, post-production editing can be a lifesaver in tough situations. To bypass the inevitable mental breakdown of dealing with small unwanted elements, Adobe’s Lightroom has revamped their Spot Removal Tool to effectively remove unwanted blemishes or objects from your photographs. The Spot Removal Tool is a powerful asset in Lightroom’s arsenal, it allows you to select an area of the photo and replace it with another area of the photo to achieve the perfect composition.
5 Benefits of Using the Spot Removal Tool in Lightroom:
1. Getting rid of unwanted elements, like the water bottle that sneaks its way into the perfect groomsmen photo.
2. Eliminating skin blemishes and imperfections this might be pimples, scratches, redness, scars or small moles.
3. Hiding pesky stray hairs, this can be a serious issue in windy outdoor photoshoots.
4. Cleaning up any lint, crumbs or specks on clothing.
5. Rectifying any dust or specks in the camera sensor. This can be invisible when you are in-camera but once the photo is blown up for digital or print use, these small imperfections become very clear.
What is the Spot Removal Tool?
The Spot Removal Tool takes an unwanted element in which you have selected and replaces it with a sample of the selected source in your image. It can be separated into two different options, the heal tool or clone tool. The clone tool takes your selected area and replaces it with another area of the photo in which you selected. The heal tool does this as well but is taken one step further where Adobe will automatically sample your replacement area and adjust the new selection while trying to match the composition of the area around it.
See Also:
What is The Rule Of Thirds in Photography?
How To Crop And Straighten Photos In Lightroom
How to Use Lightroom Brushes
How To Use Spot Removal Tool in Lightroom:
Step 1: Finding the Spot Removal Tool
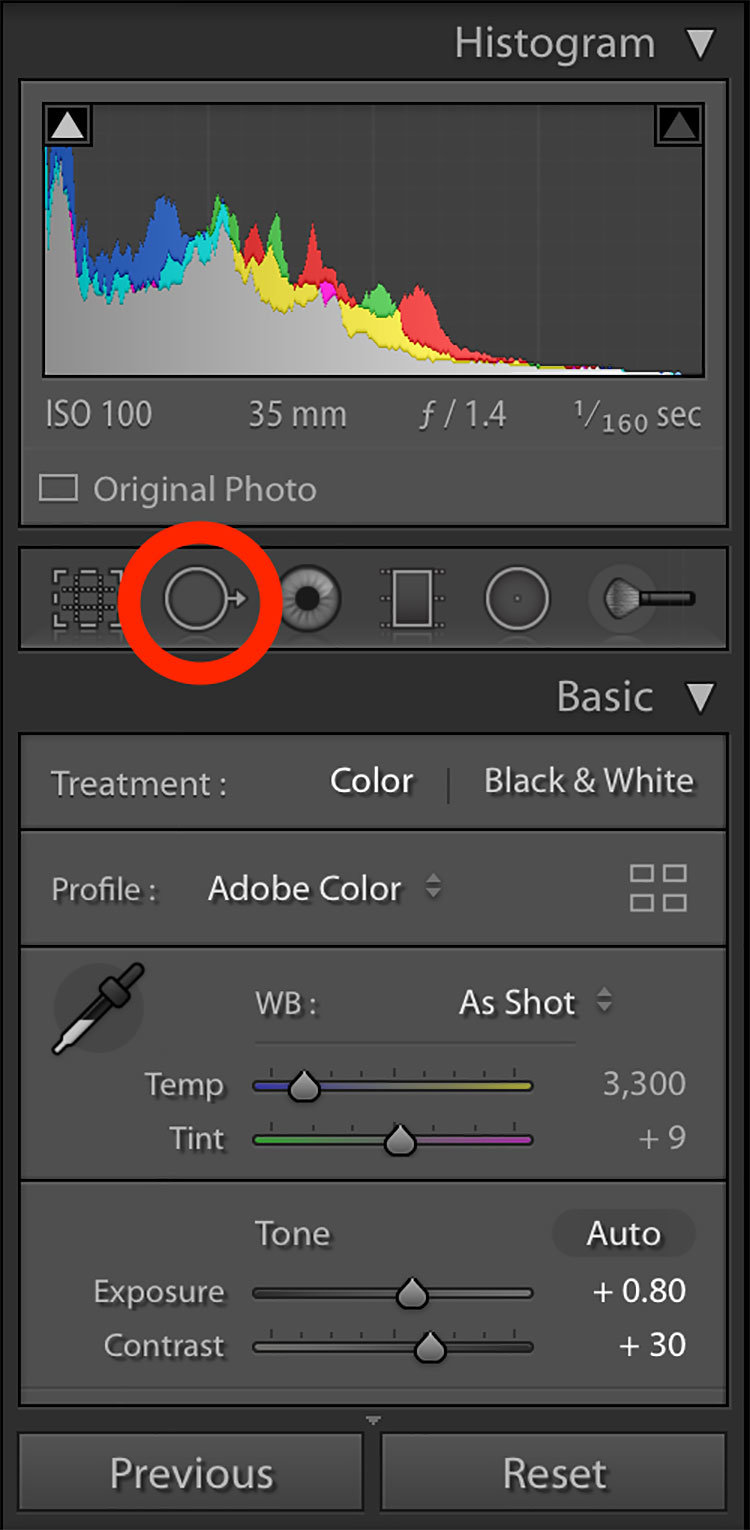
Select the spot removal tool on the right toolbar, it is located under the histogram or use the shortcut by pressing Q on your keyboard.

Step 2: Zoom and enhance!
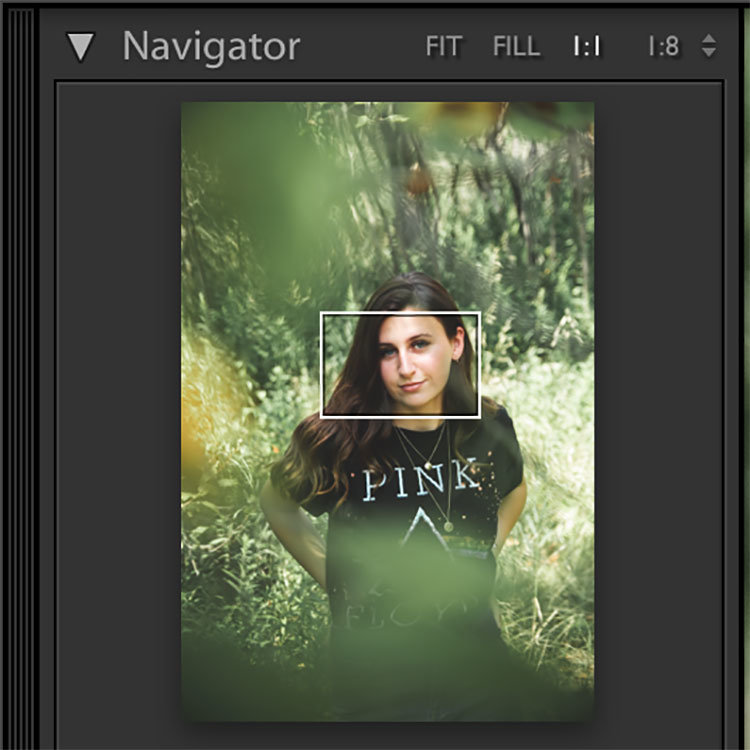
Zoom in on your image for a more precise view and to catch the marks which may not be visible to the naked eye, move around your zoomed-in photo by using the Navigator tool on the left toolbar.

Step 3: Deciding between Heal or Clone
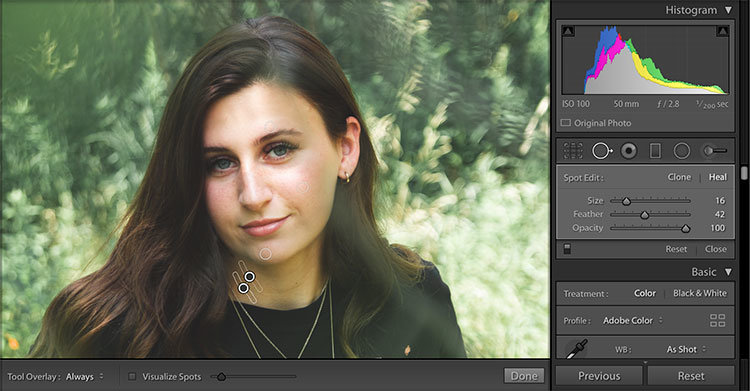
Choose either Heal or Clone (Remember, the clone tool will replace the selected area with your source area, the heal tool will automatically compensate for the surrounding area and match its composition).

Step 4: Working with Lightroom brushes!
Resize your brush, adjust the feathering and opacity. (Feathering adjusts the radius of your brush, whereas Opacity changes the density. For more info on feathering and other brush settings, check out our blog on How to Use Lightroom Brushes!)

Step 5: Selecting What To Remove
Select the area you would like to clean up. If needed, you can also drag the brush to select a larger area. A white marquee will appear around your selected area. A second white marquee will appear with an arrow, this is your sample source which will replace the old one.

Step 6: Adjustments and Perfection!
Finally, it is always good to review your image in its entirety to see the finished product. You may even want to take a break from editing. Sometimes the eyes will adjust to overlook small details. You can also add on one of our presets, located at our online store, to give your image that extra POP And display a more professional styled look! With this image we used our Hue And Hatchet Summer Vibes 01 Preset.

Visualize Spots Feature
Small dust and specks can sometimes be hard to point out to the naked eye. Adobe introduced the Visualize Spots feature into the Spot Removal Tool to give an advantage to the Creative Cloud user. The Visualize Spots option inverts the photo, you can adjust the intensity by adjusting the slider beside. This will create an outline of the photo and show smaller imperfections in a brighter light.
Step 1: Select the Spot Removal Tool or press Q on your keyboard.
Step 2: Check the Visualize Spots box at the bottom of your image.
Step 3: Move the slider to adjust the intensity of this feature.
Step 4: Use the Spot Removal Tool to clean up these areas, deselect the Visualize Spots box to review your image.

Creating a compelling composition is the objective of every photographer, but when unwanted marks get in the way post-production can be a life saver. Even though this spot removal tool has its limitations, it allows for a new world of possibilities. To take your portrait photography game to the next level using this guide to the spot removal tool and partner it with our How to Smooth Skin in Lightroom to achieve a professional feel and look.
Photo: @clarke.photos

