Photoshop Tutorial
How to Use Hue & Saturation in Photoshop
The Hue & Saturation tool in Photoshop is a simple, yet fine-tuned tool for colour management. There are many uses for this tool, including adjusting unwanted colour casts in your images, adjusting white balance, creating monochrome images, and more.
How does the Hue & Saturation Panel work?
At the most basic level, the Hue & Saturation panel will affect the overall hue, saturation, and lightness of the colours in your image. The adjustment panel contains a slider for each of these adjustments.

Hue changes the overall colour of your image. Moving this slider shifts all the colours in your image clockwise (by dragging right) or counterclockwise (by dragging left) around the colour wheel.
Saturation determines whether your image contains vibrant, highly saturated colours, or is monochrome. By dragging this slider to the right, you will increase the richness of the colours, while dragging it to the left will reduce the richness of the colours. If you drag the slider all the way to the left, you will be left with a grayscale image. Saturation can be used to add a punch of colour to a landscape or other photo, or to tone down a distracting colour, like a bright red sweater in a portrait.
Lightness affects how bright or dark your image is. Essentially, you can use this slider to change how under or overexposed your image is.
How to Use the Hue & Saturation Panel
The best way to apply hue and saturation changes is to use a Hue & Saturation Adjustment Layer, so you are applying the changes non-destructively and can remove all the changes if you need to.
To do this, go to the “Layer” menu in the top bar, go down to “New Adjustment Layer”, and select “Hue/Saturation” from that drop-down menu.

Once you have clicked “Hue/Saturation”, a new layer will be applied to your image, and a panel will appear with all the controls you will need to adjust the hue, saturation, and lightness of your image.

Hue & Saturation Adjustments with Individual Colour Channels
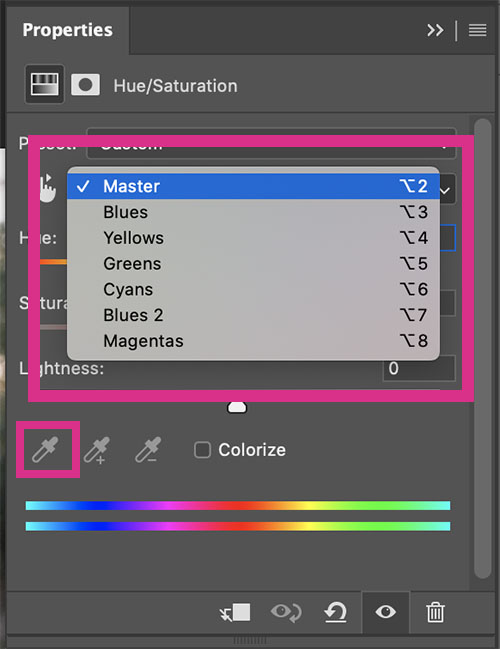
In the control panel, you will see a drop-down menu that says “Master”. This is how you control which colours you are affecting with the sliders. When Master is selected, every colour in the image will be changed. If you only want to make changes to one colour, click the drop-down and select the colour you want to change. Selecting a colour will make changes to all the different tones of that colour that are found in the image. If you only want to make changes to a specific area or shade of the colour, use the eyedropper tool to select that specific shade.

The ability to make changes to individual colours is great for when you just want to boost or town down one or two colours, rather than the entire image, or want to make different edits to different colours. For example, maybe you want to bring up the blue tones in a landscape photo, so the sky really pops, but you do not want to impact the rest of the colours. Individual colour channels are the perfect way to do this!
Keep making edits and adjusting the sliders until you achieve the result you want! If you want to reverse all the changes you’ve made, you can click the backwards arrow on the bottom of the control panel.
Creating Black & White Images with Hue & Saturation Adjustment
The Hue & Saturation Adjustment tool can also be used to create black and white images. This conversion is a two-step process.
First, create an initial black and white version by desaturating the colour in the entire image. To do this, simply apply a Hue/Saturation adjustment layer and drag the Saturation slider all the way to the left.
Next, further refine your image by lightening or darkening specific areas of the image based on their original colour. Just like in colour images, go to the colour drop-down and switch from “Master” to the colour you want to change.

Once you’ve chosen the colour you need, simply drag the lightness slider to the left to darken areas in that photo that originally contained that colour, or drag the slider to the right to lighten them.
If you do not know what colour the area was before it was converted, or unsure about what tones to adjust, you can toggle the Hue/Saturation layer on and off by clicking the eye icon next to the layer. When you turn off the adjustment layer, your original colour photo is revealed, so you can see which colours are present, then simply toggle the layer back on to continue making adjustments.
To learn more about how to convert colour photos to black and white, click here!
As you can see, the Hue & Saturation Adjustment tool in Photoshop is very powerful. Once you know exactly what it does and how each slider affects your photos, you can really take your photo editing skills to the next level.

