Lightroom Tutorial
How to Set Black and White Points in Lightroom
Most RAW images will look pretty flat straight out of the camera. Thankfully, though, because you have shot in RAW, there will be tons of information in the file that you can use to edit the photo. One of the things you can do is extend the tonal range and add contrast to your image by setting proper black and white points.
Where are the Blacks and Whites Sliders?
The Blacks and Whites sliders can be found in the Basic Panel of the Develop Module. When you slide the Blacks slider, you will be adjusting the darkest tones in the image, and when you slide the Whites slider you will be adjusting the lightest tones in your image.

Why should you set a black and a white point?
Having the widest dynamic range in your photo will give you the best-looking results and ensures you have enough contrast in your photo. When you look at the Histogram for your image, you should see that the tones extend all the way from one end of the Histogram to the other. If there are only tones in the centre range, that is how you know that you will need to adjust the dynamic range of your image. By adjusting the blacks and white, you are increasing the tonal range of your photo, and therefore adding contrast will produce a better-looking photo in the end.
How to Set Black and White Points
Before setting the black and white points in your image, you should first adjust the other sliders in the Basic panel – white balance, exposure, contrast, highlights, and shadows – as the settings of all of these sliders will affect the proper black and white points in your image.
The most basic way to set the white and black points in your image is to simply click and drag the sliders found in the Basic panel. To set the white point, drag the Whites slider until the tones on the far right side of the Histogram reach all the way to that side. To set the black point, do the same thing with the Blacks slider, but this time you want the tones to reach all the way to the left side of the Histogram.

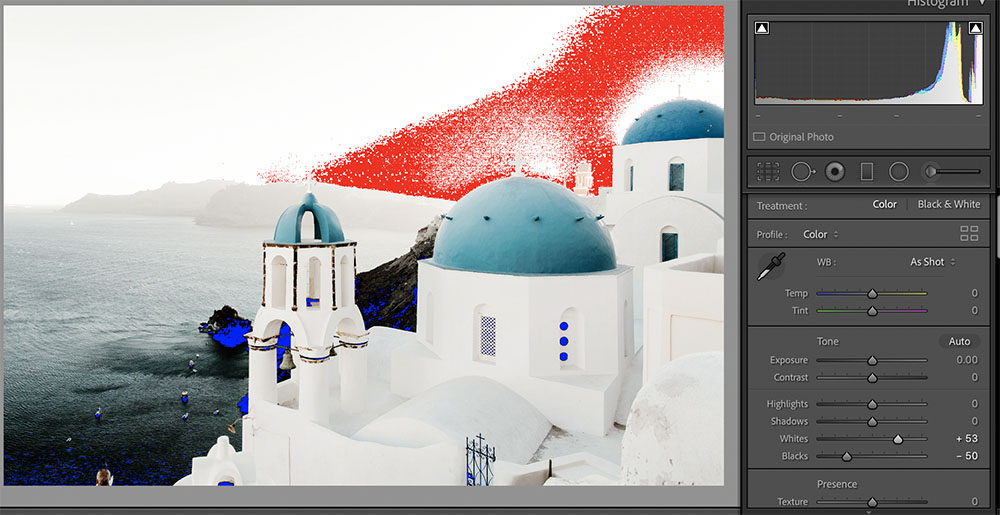
As you are adjusting the sliders, it is very important that you keep your eyes on the Histogram. Even though you want the tones to reach all the way to each side of the Histogram, you do want to avoid clipping. Clipping means that you have reached a point where the darkest or lightest pixels in your image have reached a point where they no longer have any detail. Too many clipped pixels can result in a very unattractive photo. It is generally acceptable to have a few clipped pixels in the darker range, but you do not want to have clipping in your lighter tones. This is because in real life, our eyes pick up much less detail in darker areas than light areas, so if we see a dark area in a photo with little to no detail, it will still look natural, but light areas that have been clipped will not look right as we can easily detect detail in light areas normally.
Lightroom has built in clipping warnings that you can use while editing your photos. To turn on clipping warnings, click the “J” key on your keyboard. Once you have turned this on, Lightroom will show any clipped white pixels in bright red, and any clipped black pixels as bright blue. You can also see clipping warnings directly on the Histogram. In the top corners of the Histogram you will see two triangles, and if the one on the left lights up, then you know you have clipped black pixels, and if you have clipped white pixels, the one on the right will light up.

Alternate Ways to Set Black and White Points
Although dragging the sliders will work in most situations, you might want a faster way to set the black and white point in your image, or perhaps you want Lightroom to set it for you automatically. Luckily, there are some simple keyboard-assisted techniques that you can use to do this!
Alt Method
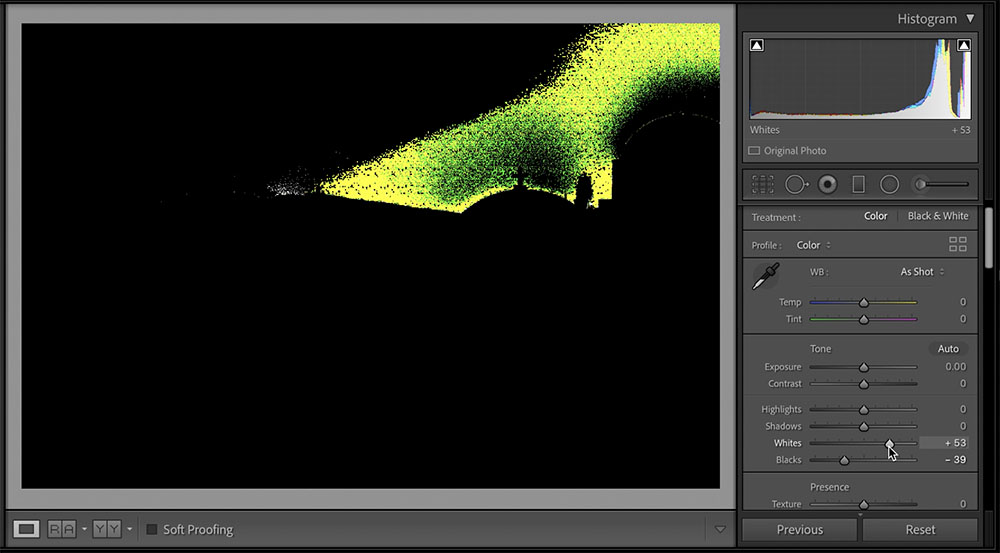
The first keyboard shortcut you can use to set the black and white points in your image is the “Alt Method”. This method will ensure complete accuracy when adjusting both the white and black points because it will give you a masked view of the image as you slide the Blacks or Whites sliders. While sliding either slider, hold down the ALT key if you are using a PC, or the Option key if you are using a Mac. This gives you a masked view of your image as you slide and will show you the actual pixels that are being clipped. Though you can turn on clipping warnings using the “J” key, this technique goes a step further by masking your whole image and showing you only the pixels that are being clipped so you can see more detail than you could with the other method.
As you can see in the photo below, the whole image is black, except for the white pixels that have been clipped, which are shown in bright green and yellow.

Auto Method
Since Lightroom 5, there has been a little-known trick that was added in relation to adjusting black and white points. Instead of manually dragging the sliders to adjust the black and white points, hold the Shift key on your keyboard and double-click the slider’s label (i.e. click the word “Whites” next to the Whites slider to set the white point) to have Lightroom set the white and black points for you.
When using this technique, you will notice that Lightroom will not let any whites clip, but it will allow some blacks to clip. This will work for the vast majority of your photos, but with any automatic editing tool, you may need to make some manual adjustments. For example, if you have a photo of a sunset, it is unavoidable to have some white pixels that clip, so you would need to adjust that yourself. But, at the very least, this method gives you a great starting point and saves you time as you don’t have to drag the sliders and adjust them manually every single time!
Setting a proper black and white point in your photo is crucial in making sure you are editing properly and getting the best results possible. Experiment with the settings in Lightroom and see how you can take your photo editing to the next level!

