Blog, Lightroom Presets, Lightroom Tutorial
How to Add a Watermark in Lightroom
As a photographer, it is natural to be protective of your work! You worked hard to capture that shot, and edit it just the right way to produce the end result you were envisioning. In today’s digital age, it can be difficult to protect your work, though. You want to post your photos online to share them with others, but then you run the risk of people stealing them or reposting them without credit! One way to protect your work and make sure credit is given where it is due, is to add a watermark to your photos. But how do you do this? Is it difficult to add a watermark to each photo? If you follow our simple tutorial below, adding a watermark to your photos in Lightroom will be a breeze!
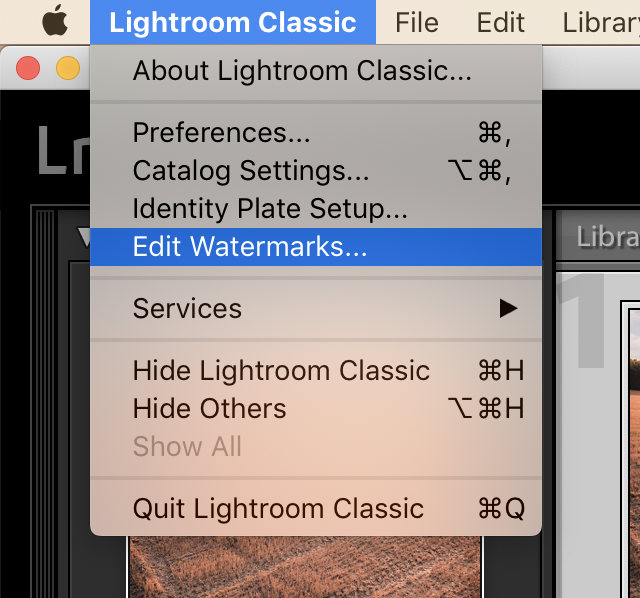
Step 1: Open the Lightroom Edit Watermarks Dialog Box
To begin creating your watermark, select “Edit Watermarks” from the “Edit” menu if you are using a PC, or from the “Lightroom” menu if you are using a Mac.

Step 2: Choose the Watermark Type
In the upper-right corner of the Watermark Editor, you will have to choose whether you want a text watermark of a graphic watermark.

If you want a text watermark:
The next step will be to type in the text you want to use as your watermark (as we have done in the photo above!). You can choose any font you have available on your computer to create the watermark.
If you want to use a graphic watermark:
The next step is to upload the image you want to use as your watermark, ideally in a PNG file format, although a JPEG will work as well! In this case, we uploaded a copy of the Hue & Hatchet logo to use as the watermark.
Step 3: Apply Options to Your Watermark
On the right of the Watermark Editor you will see an options menu that you can use to change how your watermark looks. Here, you can edit things like the font, style, alignment, colour, and drop shadow if you chose a text watermark.

For both graphic and text watermarks, you can use this menu to change the opacity, horizontal and vertical inset (position) of the watermark, and the “anchor” point of your watermark. For the Anchor, you can choose from 9 different preset positions, and then change the inset to however you want the watermark to be placed on your photo.

Step 4: Save the Watermark in Lightroom
Once you have selected all the options you want for your watermark, hit the “Save” button and name your watermark. After you have saved your watermark, you can use it in any Lightroom modules that allow you to use a watermark, as well as during export and when using publish services.

In the photo above, we followed the steps above and used the Hue & Hatchet logo as the watermark, and anchored it to the top right corner of the photo, with a slight inset so that it was a little bit away from the edge of the photo. This watermark is now saved in Lightroom, so we could easily reapply this watermark to any future photos with exactly the same settings!
There is no limit to how many watermarks you can create! Feel free to create different watermarks for different uses.
Something important to remember when you are creating watermarks in Lightroom is that watermarking is something that you apply to your photos as you export or publish them, so you will not see your watermark on your photos as you are editing them inside Lightroom.
How to Apply Your Watermark During Export
Now that you have created your watermark, it is super easy to start applying it to all of your photos!
Simply begin to export your photos, and near the bottom of the Export dialog box, you will see the “Watermarking” drop-down menu. From this dropdown, select the watermark you want to apply.

Then, simply click export and your image will be exported with the same watermark you created earlier!

As you can see, creating a using a watermark in Lightroom is super easy and a great way to protect your photos before posting them online!

